Mercury Glass? Faux Sho! (tutorial)
Posted: September 26, 2011 Filed under: Accessories, Fall, Paint, Spray Paint | Tags: Fall decor, Mercury Glass, Tutorial 41 CommentsHello Hello!!! Thanks so much for stopping by! If you are coming from Pinterest, I hope you find this tutorial helpful and are able to make some amazing Mercury glass of your own! As of June 2013, this blog will no longer have new posts. I have stopped blogging here at White Picket Bentz and am now at The Landing Pad. This blog will remain up and active for the old posts, but I have also put this same tutorial over there as well, so feel free to hop on over to the new blog and take a look around!!!
I LOVE me some mercury glass! There are so many awesome options out there……
 Pendant Lamps (Pottery Barn)
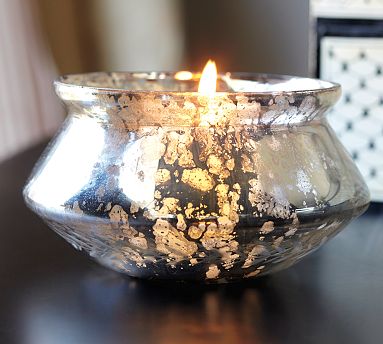 Candle holders (Pottery Barn)
….and you may remember my mercury glass pumpkins that were tragically sold out just a short time ago……..(side note – the small and large are back, but if you keep reading….I don’t need them!)
While lamenting that I wouldn’t have the chance to purchase one of those big beauties (for $39 at PB) I remembered that I had saved a mercury glass tutorial on Pinterest……I had seen DIY’d pendant lamps (like the one above) and tons of hurricane vases. I had these saved for a “some day” project when I needed something new, but then I remembered this guy……
A clear pumpkin candy dish I was given as a hand-me-down from my mom when I had zero fall decor! I had used it for Halloween candy in the past, but this girl’s hips (and the hubs) sure don’t need to have that tempting goodness junk around the house! I was PUMPED to get started (insert 1st giddy, dance-around-the-house of this post here….let’s keep count!)
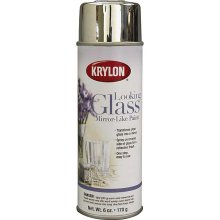
As I learned in my faux-mercury glass research, the key “ingredient” to knocking-off these fabulous decor pieces was the Krylon Looking Glass spray paint…
After driving all over creation, we learned that this is not sold at Lowes, Home Depot, Wal-Mart, Sherwin Williams or ACE Hardware. According to my research it is sold at Hobby Lobby (closed on Sunday – not going to help my Sunday afternoon search), Michaels, and JoAnn Fabric. Shaun and I ventured to Michaels and searched the spray paint section…..no luck. We headed to JoAnn’s…….again, nothing. I did some quick research on my phone and saw that Michaels has it, but you have to look in the glass paint aisle.
Back to Michaels we went. You can imagine the ecstatic-ness when we found it in the glass paint aisle. There was even a mini-happy dance in the aisles at Michael’s. I had to keep it under wraps though, we were out in public and Shaun gets embarrassed by me! The paint was $12.99 (sort of pricey) but with a 40% off coupon, $8 mercury glass was within my reach!!!!
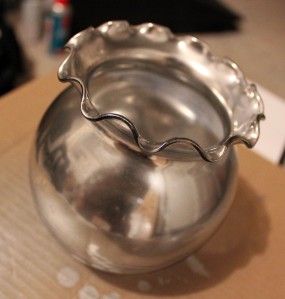
(Now, on to the action part of this segment!) If you are going to make your own, I HIGHLY suggest practicing on some junk glass that you are okay to mess up. GoodWill is a good spot to hit up for some cheap vases/candle holders/cups, etc. We had a bunch of leftover vases from our wedding so I got to work…..my first two attempts were nothing to be proud of……read – total failure.
I had to get my technique right before I moved on to try #3….and thankfully that was a success.
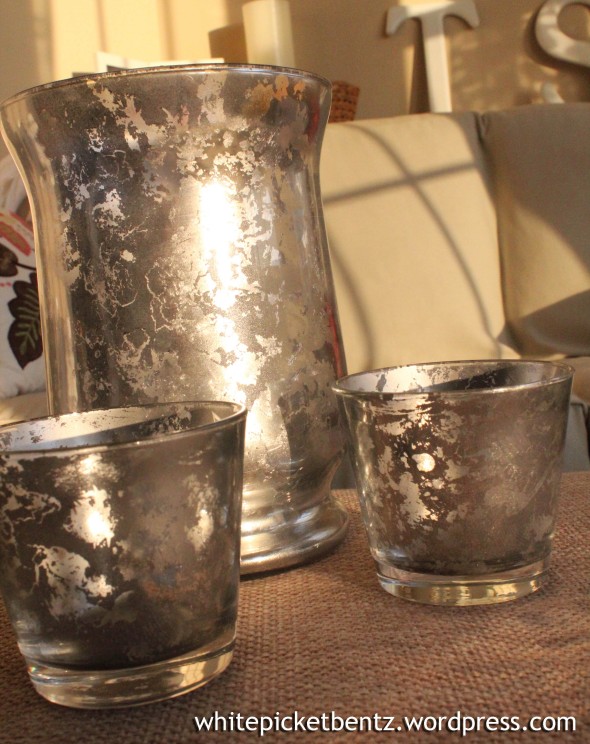
For those of you who want to make your own mercury glass…..this tutorial will help you make awesome mercury glass on your own…and for cheap!
Supplies
- Krylon Looking Glass Spray Paint
- Glass vase, candle cup, etc.
- Spray bottle with 1/2 water, 1/2 vinegar
- Paper towels
1. It’s best to lay your piece on its side, if possible. You will be spraying the INSIDE of the glass. The paint is sprayed on the side opposite of the mirror finish.
2. Spray the Looking Glass paint in short, light bursts, holding the can approximately 6-8 inches away from the opening of the glass. After each spray, turn the glass a quarter turn. The Looking Glass paint can be runny, so the key to successful coverage is the light, short bursts. If your paint “puddles” on the glass, you can try to wipe it up a bit but it won’t cover evenly.
3. The paint will appear a dull gray at first, but in just a few short seconds, the wonderful mirror-magic will appear right before your eyes! (insert happy dance-around-the-garage #2 here)
4. Allow your paint to dry for only about 60 seconds.
5. Lightly spray the inside of the glass with the vinegar/water mixture so it beads lightly on the paint. The vinegar is acidic enough to begin to eat away at the paint on the glass.
6. Let the beads “set” for a minute and tightly wrap your pointer finger with a sheet of paper towel. Soak the paper towel with the vinegar/water mixture.
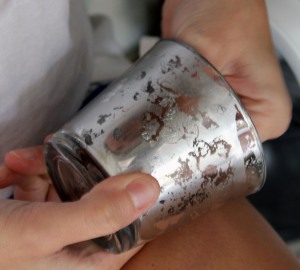
7. Begin to “push” on the beads of water with the paper towel to “break” the paint…..
Its easier to watch your work through the outside as you go, so you can see the “pattern” you are making in the paint. Be careful to keep the paper towel tight around your finger, or else you will wipe away the paint on the side opposite of where you are working.
When “pushing” the paint, push firm enough to move the paint, but do not wipe the paint away. The key is to just move the paint around – creating a crackle effect, rather than wiping it off.
Once they were dry, I sprayed the inside of mine with a clear sealer from Krylon to protect the paint in the future. You could also use a brown glaze on the inside to give your glass a nice warm tone. I preferred the “original” look.
Obviously, due to the serious flammable, toxic nature of the paint/sealer, no food items can go in these glasses!
Once I got a few successful pieces done……LOVE THEM!!! Happy dance #3!!!!!
….I moved on to my little pumpkin……
Insert HUGE happy dance here!!! I love it!!! So much better than paying $39+tax+shipping from good ole PB for one pumpkin!
If you don’t have one of these pumpkin candy dishes already, you can find them just about anywhere this time of year from grocery store seasonal aisles, to Target, WalMart, craft stores, etc. I think you can get them for under $5!
Total cost for mercury glass pumpkin, hurricane, and 2 tea-light holders:
Roughly $8! That is some definite bang for your buck!
Here she is, all staged and ready to go for Fall along with some other metallic pumpkins and leaves!!
Fall has officially arrived here at the Bentz house! What do you think??
Hope you can use this tutorial and make some awesome mercury glass for yourself!






Thanks for your tutorial. I just received my 2 cans of Looking Glass paint, I had to order off Amazon for $23.00 that’s with free shipping. I hope I have as nice results as you had,I hope to make some awesome Christmas decor. Now I’am excited to try it out. I will probadly do a jigg around my garage too! Who cares what the neighbors think…..
Yay! Hope you have luck making some FABULOUS Christmas decor and guaranteed happy dances!! My #1 suggestion, have a few pieces of “junk” to practice on! It takes a few tries! I need to start thinking about Christmas glass too…… Our whole house may soon be mercury-ized!
I saw one tutorial for mercury glass that suggested painting the OUTSIDE if you want to use the glass as a vase. What do you think?
I am not sure that would work. The paint is created so the “underside” of the paint gives the mirror effect, so spraying it on the inside of glass puts the mirror effect outward to see. Looking at the inside of my vases the actual paint is full and grey, not shiny and gorg!! I may be wrong and it may be worth a try on an old glass piece!!!
I see what you’re saying, but I really need to know if its safe to fill it with water. Is it ok?
I honestly have no idea.
I use mine for candles! Sorry!
I can not wait to try this!
Deana
It seems like a lot of work to make a beautiful candy dish that CANDY can’t go in! Or a cute candle holder that can’t hold a CANDLE! Ugh! It’s beautiful, but I think I’d rather save my money (and time) for the safe, usable mercury glass.
Erin, thanks for your comment! It actually ISN’T a lot of work and could take less than 10 minutes to do a piece once you get the hang of it. The candle holders can hold flickering LED candles and no one would know. I also didn’t make the pumpkin to be a candy dish, it just so happened that is what I had laying around. I don’t mind losing its candy holding capabilities! I also take pride in making things on my own and would rather make several different pieces for the price of one piece from a store that they SAY is safe, but you can’t guarantee! It is called mercury glass for a reason! To each his own! Happy shopping!
[…] penny. Good news for all you DIY-ers…Pinterest is replete with how to’s such as this DIY mercury glass tutorial on White Picket Bentz […]
Tiffany ~ thanks so much for this tutorial. I have lots of old vases in basement that I am going to practice on. Sent my husband out for the mirror paint and he got it at Michael’s! Yay!
Karen
Good luck Karen! I’m sure your mercury glass with look awesome! What a good husband you have!!!
~ Tiffany
can you tell me how bad this spray paint smells? i am really sensitive, and maybe ok if i do this outdoors…but after it is all dry, did you notice any lingering smell at all on the vases ? some times paint can continue to give off some bothersome fumes, for weeks or longer. didn’t want to try this if i can’t bring it in the house. thanks, they do look lovely.
Hello! If I remember correctly, it smells no worse than regular spray paint. Definitely do it outside!! And there was no lingering smell any worse than normal paint. Maybe leave them outside to air out for a day or two before bringing them in? Good luck! I hope you love your vases when done!
thank you….i think i might try using a wee foam brush, instead of paper towel, to push the paint. could trim off edges of brush as desired…maybe even a small bristle brush may work and not be as likely to remove as much paint as the paper towel [i am not too handy]. or a tiny sea sponge on a stick may help make the pattern…
also, brush may fit inside some smaller spaces where the hand gets in it’s own way. could wipe off the brush and dip in vinegar as needed. i have an old partial set of plain, asst sizes of drinking glasses, they would make good led candle holders. but then i’d finally have to buy new glasses. ❤
Our Walmarts now have the Looking Glass Spray…way cheaper than Michaels.
Your instructions are the best I’ve read yet. Very helpful! I also ran around town trying to find this paint. Only place that had it was Hobby Lobby. And I got the last can. Happy dance for me!
Glad you found the instructions helpful!! And glad you found the paint! Seems to be a tough one to find! Hobby Lobby is always a good one though! Hope your project turned out awesome!
have you tried this with any colored glass pieces? I have some green colored glass and can’t imagine what it would look like. Thanks for the great directions. K
No I haven’t! Now I’m curious how it would work!! If you do it to colored glass I would love to see a picture!!
Has anyone tried this in a light fixture? I know you said it’s flamable, but if the shade is far enough from the bulb, does it matter?
I’m sure someone out there has!! I will take no responsibility but I would think if you let the paint cure long enough, maybe outside to rid it of fumes and things, and the bulb is far enough away, it should be ok!!!
What about making glass tiles to frame a mirror? Would the paint stay on if you used mastic, or whatever glue they use to glue on tiles? Would bathroom moisture make them come loose do you think? I LOVE the look and think it would look super around a mirror!
That would be gorgeous. I would think the glue might make the appearance a little different but is worth a try!! I would love to see it if you do it!! Good luck!
Thanks for the help, love to try this. Have you ever used it in colored glass? Hope I can find your instructions again when I getnhome and have a printer..
I have not tried colored glass. Several people have asked the same thing. I would love to know how it works!! Good luck!
For those concerned about being able to use the vase, just purchase a smaller vase that will fit inside.
[…] 38. Make your own Mercury glass vases and votives (they’ll cast a little French light!) with this tutorial: https://whitepicketbentz.wordpress.com/2011/09/26/mercury-glass-faux-sho-tutorial/ […]
Is it safe to put real candles inside afterwards? I was thinking of making some of these for table decor to hold tealights, but I’m afraid with the flammable nature of the paint, they will go up in flames!
I am actually not sure! I haven’t used mine for candles although that was my intention. I would think if you let the paint cure, outside for a bit of time it might make it more safe. But I am NOT an expert! Battery operated tea lights might be a safer alternative!
[…] White Picket Bentz, Diy Mercury glass […]
I’ll try again tomorrow …when the wind isn’t howling. My first attempt didn’t turn out so well.
My first attempt didn’t either! It takes some trial and error to get the method right! Good luck!
Lovely idea .. definitely going to try this one ! Thanks for sharing.
I have a great favor to the bracelet, when I see the bracelet at your post, there is a desire in my heart “I want to get one like this”.
I took your tutorial a step further and applied gold leaf (available at HobbyLobby) sparingly with Modge Podge. The MP helps break up the surface of the gold foil so light can show through. To restore areas of silvered mirror, I applied silver foil. A word of caution: hold back your annal tendencies and leave some open spaces which are clear of paint and foil. The irregularities are what makes this beautiful.
I had a bottle that I wanted to do this to, but the opening of course is not wide enough to spray without getting lots of drips. I sprayed on the outside, and It actually looks ok. It took a few try’s before I got it down, and I gave it two coats.
Nice post. I learn something totally new and challenging on websites I stumbleupon everyday.
It will always be interesting to read through articles from other writers and practice something from their sites.
Hi Tiffany , Thanks so much for your tutorial it was great . I have seen quite a few , but your instructions are awesome . so .easy Thank-you . 😉 I picked up a can of Kyron looking glass here from Spotlight in Australia for $29.99 a can . They only got it instore 3 moths agao , I have been regulary asking .. & there is no where else in Australia that stocks it .. crazy I know …. I sooo wish I lived close to the U.S sometimes Becuase of its price lol . too . I have saving it so I use on something I am absolutely going to love , I dont want to waste it on Tealights vases or anything really small lol as it is so much more expensive here in W.A . My girlfriend used it & when it completely dried she went over it with a glass colored paint , such as Red I think it was .. a little mecury glass bird . It looked amazing when she placed the batteries inside the bird 🙂 the bird she had done in Silver first 🙂 Welll thanks again , I am Thinking of doing a lampshade ,, or a large floor vase over the weekend . Wish me luck !! And Big Happy new Year to you & everyone.. have a great 2014 X
I love your post. I’m planning on trying it in a few days. Did you have to do several coats of the spray paint before applying the viniger mixture? If so, how long did you wait in between coats?
I only Had to do one coat. Spray it on and make sure it’s covered and spray with vinegar right away. Let the vinegar soak for like 30 seconds and wipe.